Create Automated 12V Device Control with Arduino
How to Control 12V Devices with Arduino
Control of 12V devices with Arduino can seem like an intimidating task, but with some basic knowledge of Arduino and electricity, it’s not very difficult. This tutorial covers the basics of controlling 12V devices such as lights, relays, and motors with Arduino.
Understanding the Basics
It’s important to understand that the Arduino is a 5V board, while 12V devices require 12V power. As such, there are a few ways to bridge the gap between the Arduino and the 12V device. The most common is to use a relay to switch the 12V current on and off. Relays are sometimes referred to as switches, and they come in different sizes and shapes with various specifications.
Preparing the Relays and Connecting Wires
To begin, you will have to prepare the relays for use. The first step is to attach the wires to each side of the relay, making sure the positive (green) wire is attached to the “+” side and the negative (black) wire is attached to the “-” side. The next step is to attach the Arduino’s control wires to the relay. Once the wiring is complete, the Arduino and relay should be connected together. The positive (+) wire of the Arduino needs to be connected to the “+” side of the relay, and the negative (-) wire of the Arduino needs to be connected to the “-” side of the relay.
Programming the Arduino
Once the wiring and connections have been established, the next step is to program the Arduino for control of the 12V device. There are a few different ways to do this, but the most basic is to use the digitalWrite() command. With this command, you can set a given pin to either HIGH or LOW, which will in turn activate or deactivate the 12V device connected to it. For example, if the Arduino is connected to a relay that is connected to a light bulb, the digitalWrite() command can be used to turn the light bulb on or off. You can also use other commands such as the analogWrite() command to control devices with more precision than digitalWrite(), and the pulse-width modulation command to control devices with even greater accuracy.
Diagram
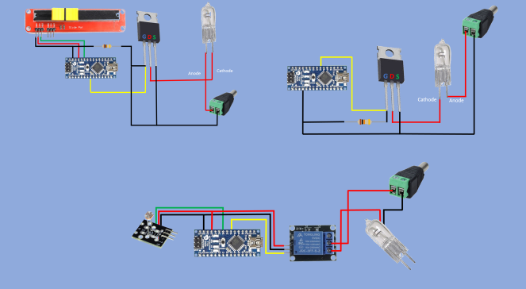
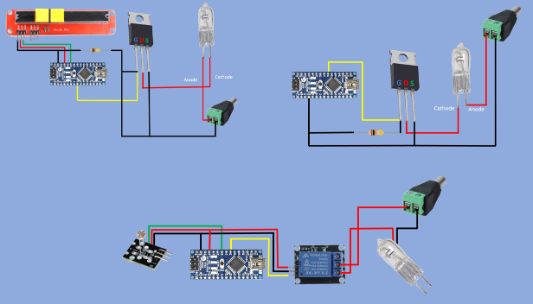
Components Required
- Arduino Nano R3
- KY-018
- Linear Potentiometer
- 12V Light bulb
- PIR Motion Sensor (generic)
Switching 12VLED on with photoresistor
int light_intensity;
#define LedPin A3
#define PhotoresistorPin   A5

void setup() {
 pinMode(LedPin, OUTPUT);
 pinMode(PhotoresistorPin,   INPUT);
}

void loop() {
  light_intensity=analogRead(PhotoresistorPin);
   if (light_intensity > 290)
    digitalWrite(LedPin,HIGH);
  else
     digitalWrite(LedPin,LOW);
Switching on 12V LED using Motion Sensor
int motion_detected;
#define LedPin A3
#define MSPin 10

void  setup() {
  Serial.begin(9600);
  //Calibrating sensor
  Serial.println("Calibrating  sensor ");
  delay(60000);
  Serial.println("Done");
  pinMode(LedPin,  OUTPUT);
  pinMode(MSPin, INPUT);
}

void loop() {
 motion_detected  =digitalRead(MSPin);
 if(motion_detected == HIGH)
   digitalWrite(LedPin,  HIGH);
 else
   digitalWrite(LedPin, LOW);
}
Diming 12V LED with potentiometer
int LED_Intensity;
#define LedPin 5
#define PotentiometerPin A6

void  setup() {
 pinMode(LedPin, OUTPUT);
 pinMode(PotentiometerPin, INPUT);
}

void  loop() {
  LED_Intensity=map(analogRead(PotentiometerPin),0,1023,0,255);
  analogWrite(LedPin, LED_Intensity);
}
Switching on 12V LED using Motion Sensor
int motion_detected;
#define LedPin A3
#define MSPin 10

void
  setup() {
  Serial.begin(9600);
  //Calibrating sensor
  Serial.println("Calibrating
  sensor ");
  delay(60000);
  Serial.println("Done");
  pinMode(LedPin,
  OUTPUT);
  pinMode(MSPin, INPUT);
}

void loop() {
 motion_detected
  =digitalRead(MSPin);
 if(motion_detected == HIGH)
   digitalWrite(LedPin,
  HIGH);
 else
   digitalWrite(LedPin, LOW);
}
Switching 12VLED on with photoresistor
int light_intensity;
#define LedPin A3
#define PhotoresistorPin  A5

void setup() {
 pinMode(LedPin, OUTPUT);
 pinMode(PhotoresistorPin,  INPUT);
}

void loop() {
  light_intensity=analogRead(PhotoresistorPin);
  if (light_intensity > 290)
    digitalWrite(LedPin,HIGH);
  else
    digitalWrite(LedPin,LOW);
Conclusion
Controlling 12V devices with Arduino is not as daunting as it may seem. With some basic understanding of Arduino and electricity, you can use relays and commands such as digitalWrite() to easily control 12V devices from an Arduino board.