Get Started with the Python Shop Management System Project with Source Code
Python Shop Management System with Source Code
Are you thinking about setting up and managing a retail store? Do you want to know how to build a shop management system with Python? If so, then you have come to the right place. We are introducing an incredible Python shop management system with source code that can help you get started with your store in on time.
The Python shop management system enables user to effectively manage their store. This system uses Python programming language, which is one of the most powerful and popular programming languages available in the market today. The source code of this system is designed to help users efficiently set up and manage their shop without any hassle. With its in-depth features like inventory tracking, customer management, sales tracking, and more, the system can prove to be a great asset to any shop or store.
To make things simpler, the entire source code of this system is provided in HTML format. This makes it easy to customize the system according to your specific needs. Also, since the code is written in Python, you can easily edit and update the code to implement new features or make changes to the system as and when required. Furthermore, the code is completely open-source, so you can use it for free.
Ultimately, the Python shop management system is an excellent choice for anyone looking to set up and manage a store. The source code of the system makes it easier for users to customize it to fit their needs. All in all, it is a great system for store owners to use for their store. So, if you are looking for an efficient way to manage your shop, then this is the system for you!
Step-by-Step Guide: Building a Python Shop Management System Discover the process of creating a shop/store management system project using Python with the following sequential steps:
-
Importing Required Modules Commence by importing the necessary modules that will be utilized in your project.
-
Initializing the Application Window Set up the main application window or user interface to act as the platform for your system.
-
Crafting the "Add Items" Function Develop a function to empower users with the ability to seamlessly add items to the management system.
-
Implementing the "Delete Items" Function Engineer a function that empowers users to efficiently remove items from the system as required.
-
Building List Management Functionality Architect a function to handle the creation and administration of lists within the management system.
-
Introducing Item Search Function Construct a function that enhances user experience by facilitating the quick and effective searching of items within the system.
-
Integrating the "Clear Screen" Function Incorporate a function that offers users a convenient way to clear the screen or interface for improved usability.
-
Facilitating the Exit Mechanism Establish a function that provides users with a smooth and graceful exit or closure of the application.
-
Defining Button Labels and Entry Widgets Lay the foundation by defining the crucial buttons, labels, and entry widgets within the user interface.
Example Python code for a simple shop management system using the tkinter library for the GUI:
#DataFlair- import modules
from tkinter import *
import tkinter as tk
from tkinter import messagebox
import os
f=open("Proj_Database",'a+')
#Initializing the window
root = Tk()
root.title("Shop Management System by Electro4u.net")
root.configure(width=1500,height=600,bg="#e3f4f1")
var=-1
#Function to add items
def Add_Items():
global variable
Lines_no = 0
with open("Proj_Database", 'r') as f10:
for line in f10:
Lines_no += 1
variable=Lines_no-1
EN1= Entry_1.get()
EN2=Entry_2.get()
EN3=Entry_3.get()
EN4=Entry_4.get()
EN5=Entry_5.get()
f.write('{0} {1} {2} {3} {4}\n'.format(str(EN1),EN2,EN3,str(EN4),EN5))
Entry_1.delete(0, END)
Entry_2.delete(0, END)
Entry_3.delete(0, END)
Entry_4.delete(0, END)
Entry_5.delete(0, END)
messagebox.showinfo("ADD ITEM", "ITEM ADDED SUCCESSFULLY....!!!!!")
#Function to delete items
def Delete_Items():
E1=entry1.get()
with open(r"Proj_Database") as f, open(r"Proj_Database1", "w") as working:
for line in f:
if str(E1) not in line:
working.write(line)
entry1.delete(0, END)
entry2.delete(0, END)
entry3.delete(0, END)
entry4.delete(0, END)
entry5.delete(0, END)
os.remove(r"Proj_Database")
os.rename(r"Proj_Database1", r"Proj_Database")
messagebox.showinfo("DELETE ITEM", "ITEM DELETED SUCCESSFULLY....!!!!!")
f.close()
working.close()
#Function for making list
def list():
global var
var=0
f.seek(var)
root_1 = Tk()
root_1.configure(bg="Gray")
root_1.title("Stationary Store Database")
scroll = Scrollbar(root_1)
scroll.pack( side = RIGHT, fill = Y)
My_text = Text(root_1, yscrollcommand = scroll.set ,width=24,height= 18 ,bg= "gray",fg="black", font=("Times", 16))
string = f.read()
My_text.insert(END,string)
My_text.pack( side = LEFT, fill = BOTH )
scroll.config( command = My_text.yview )
#Function to search items
def Search_Item():
entry1.delete(0, END)
entry2.delete(0, END)
entry3.delete(0, END)
entry4.delete(0, END)
entry5.delete(0, END)
i=0
flag = 1
E1 = entry6.get()
with open(r"Proj_Database") as working:
for line in working:
i=i+1
if str(E1) in line:
flag = 0
break
try:
if flag != 1:
v = list(line.split(" "))
entry1.delete(0, END)
entry2.delete(0, END)
entry3.delete(0, END)
entry4.delete(0, END)
entry5.delete(0, END)
entry1.insert(0, str(v[0]))
entry2.insert(0, str(v[1]))
entry3.insert(0, str(v[2]))
entry4.insert(0, str(v[3]))
entry5.insert(0, str(v[4]))
except:
messagebox.showinfo("Title", "Error end of file")
if flag !=0:
messagebox.showinfo("Title", "NOT FOUND")
working.close()
#Function to clear screen
def Clear_Item():
entry1.delete(0, END)
entry2.delete(0, END)
entry3.delete(0, END)
entry4.delete(0, END)
entry5.delete(0, END)
entry6.delete(0, END)
#Exit function
def Exit():
Exit= messagebox.askyesno("Exit the System","Do you want to Exit(y/n)?")
if Exit > 0:
root.destroy()
return
#Define buttons labels and entry widget
#All labels Entrys Button grid place
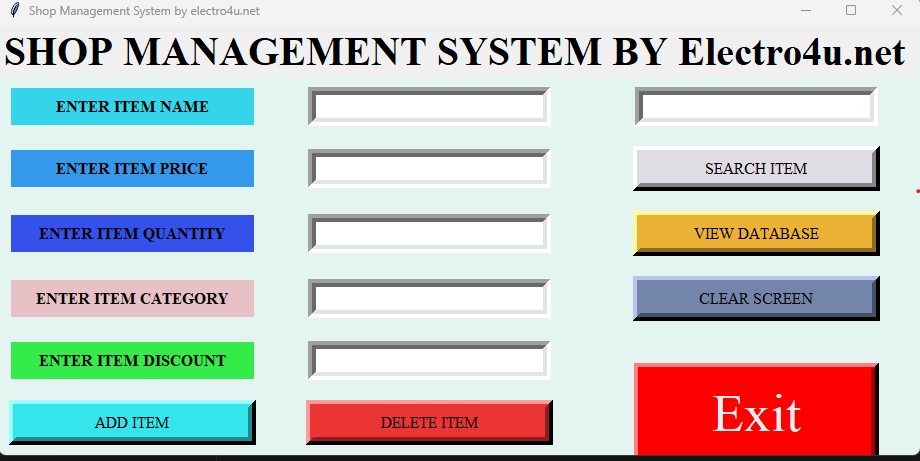
Label_0= Label(root,text="SHOP MANAGEMENT SYSTEM BY DATAFLAIR ",fg="black",font=("Times new roman", 30, 'bold'))
Label_0.grid(columnspan=6)
Label_1=Label(root,text="ENTER ITEM NAME",bg="#e8c1c7",fg="black",bd=8,font=("Times new roman", 12, 'bold'),width=25)
Label_1.grid(row=1,column=0)
Entry_1=Entry(root, font=("Times new roman", 14),bd=8,width=25)
Entry_1.grid(row=1,column=1)
Label_2=Label(root, text="ENTER ITEM PRICE",height="1",bg="#e8c1c7",bd=8,fg="black", font=("Times new roman", 12, 'bold'),width=25)
Label_2.grid(row=2,column=0)
Entry_2= Entry(root, font=("Times new roman", 14),bd=8,width=25)
Entry_2.grid(row=2,column=1)
Label_3=Label(root, text="ENTER ITEM QUANTITY",bg="#e8c1c7",bd=8,fg="black", font=("Times new roman", 12, 'bold'),width=25)
Label_3.grid(row=3,column=0)
Entry_3= Entry(root, font=("Times new roman", 14),bd=8,width=25)
Entry_3.grid(row=3,column=1)
Label_4=Label(root, text="ENTER ITEM CATEGORY",bg="#e8c1c7",bd=8,fg="black", font=("Times new roman", 12, 'bold'),width=25)
Label_4.grid(row=4,column=0)
Entry_4= Entry(root, font=("Times new roman", 14),bd=8,width=25)
Entry_4.grid(row=4,column=1)
Label_5=Label(root, text="ENTER ITEM DISCOUNT",bg="#e8c1c7",fg="black",bd=8, font=("Times new roman", 12, 'bold'),width=25)
Label_5.grid(row=5,column=0, padx=10, pady=10)
Entry_5= Entry(root, font=("Times new roman", 14),bd=8,width=25)
Entry_5.grid(row=5,column=1, padx=10, pady=10)
Button_1= Button(root,text="ADD ITEM",bd=8, bg="#49D810", fg="black", width=25, font=("Times new roman", 12),command=Add_Items)
Button_1.grid(row=6,column=0, padx=10, pady=10)
Button_2= Button(root, text="DELETE ITEM",bd=8, bg="#49D810", fg="black", width =25, font=("Times new roman", 12),command=Delete_Items)
Button_2.grid(row=6,column=1, padx=40, pady=10)
Button_3= Button(root, text="VIEW DATABASE",bd=8, bg="#49D810", fg="black", width =25, font=("Times new roman", 12),command=list)
Button_3.grid(row=3,column=3, padx=40, pady=10)
Button_4= Button(root, text="SEARCH ITEM",bd=8, bg="#49D810", fg="black", width =25, font=("Times new roman", 12),command=Search_Item)
Button_4.grid(row=2,column=3, padx=40, pady=10)
Button_5= Button(root, text="CLEAR SCREEN",bd=8, bg="#49D810", fg="black", width=25, font=("Times new roman", 12),command=Clear_Item)
Button_5.grid(row=4,column=3, padx=40, pady=10)
Button_6= Button(root,highlightcolor="blue",activebackground="red", text="Exit",bd=8, bg="#FF0000", fg="#EEEEF1", width=25, font=("Times", 40),command=Exit)
Button_6.place(x=635,y=337,height= 102,width=245)
Entry_6= Entry(root, font=("Times new roman", 14),justify='left',bd=8,width=25)
Entry_6.grid(row=1,column=3, padx=10, pady=10)
root.mainloop()In this example, we first import the tkinter library and define a ShopManagementSystem class that inherits from tk.Frame.
We create labels and entry fields for the product information, as well as buttons for adding and removing products. We also create a listbox to display the products.
We define methods for adding and removing products, which get the product information from the entry fields and add or remove the product from the listbox. We also handle errors for invalid input.
Finally, we create